Escaping The Wrist Grab
Part 2 - From The Opposite Side
by Christopher Caile
Editor's Note: This is the second article in a series on escaping
from wrist grabs. Part
1 discussed several self-defense options against a same
side grab. This article, will do the same for grabs of a wrist by the
opponent's opposite arm. Part 3 will discuss two hand wrist grabs.
As discussed in Part 1of this series, while historically wrist grabs
often related to stopping an opponent from use of a weapon, today they
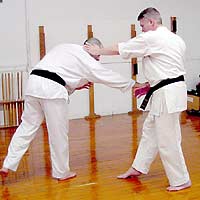
are most often used by one person to control another. Here the attacker
has seized the defender's left wrist with his own right hand. As with
Part 1, Part 2 will also discuss several self-defense options for this
attack.
This article will explore and compare several self-defense techniques
useful against a wrist grab from across the body. While there are also
many other effective techniques, space limited what could be discussed.
Those that are presented, however, are simple and effective.
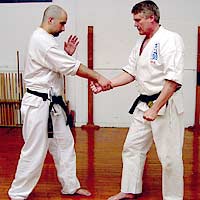
 One
method of self-defense against this technique is simply to raise your
fist to the inside of the grab, as is shown here, and while grabbing your
own fist with your other arm to pull back (this option is not shown) against
the attacker's thumb -- the weak link in most wrist grabs. This is similar
to the first option presented in Part I against a grab from the same side.
Often an initial strike to the face of the attacker with the opposite
hand, or a quick, hard kick with the inside of the foot to the shin of
the attacker will either make the assailant let go entirely or greatly
distract him or her while you execute the second part of this technique. One
method of self-defense against this technique is simply to raise your
fist to the inside of the grab, as is shown here, and while grabbing your
own fist with your other arm to pull back (this option is not shown) against
the attacker's thumb -- the weak link in most wrist grabs. This is similar
to the first option presented in Part I against a grab from the same side.
Often an initial strike to the face of the attacker with the opposite
hand, or a quick, hard kick with the inside of the foot to the shin of
the attacker will either make the assailant let go entirely or greatly
distract him or her while you execute the second part of this technique.
The advantage in this defense is that in pulling back you also pull
the attacker's shoulder forward which can inhibit a punch by the other
arm. Also, as you sink back you can move your weight to the back foot,
allowing a front snap kick (not shown) by your front foot. From this position
you can also easily run away.
There are a couple of disadvantages to this technique, however. First,
you are using strength (and your weight) against the opponent's grip,
and if he or she is significantly stronger, this escape might not work.
Another problem is that while you are doing this, the attacker might be
able to reach out and grab you or hit you with the other hand, or kick
you. Thus this technique is problematic -- good for some, but also dangerous.
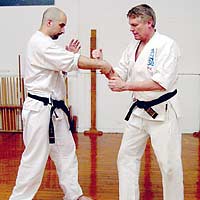
| A second approach, which I prefer, is the following.
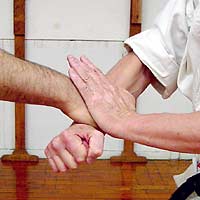
Your free hand could strike out toward the opponent's face. This
is optional, but it is a good distraction, or stunning technique,
depending if you actually strike the opponent or not (this is not
shown). Then, instead of pulling back against the grab -- muscle
against muscle -- and supporting your wrist with your opposite palm
(as seen in the photo), step in toward the attacker (be sure to
raise your hand above the level of the attacker's grip on your wrist)
while twisting to the side. |
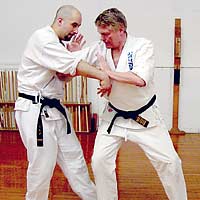 |
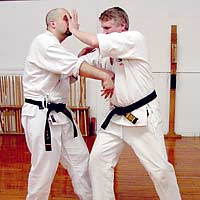
But there is more. If the attack is more than a playful interlude, this
same movement can be turned into an attack. The first step is to use the
bent elbow as a strike into the opponent's chest (shown here) or upwards
into the face (not shown). If you step in deeply, the opponent will also
be unbalanced to the rear.
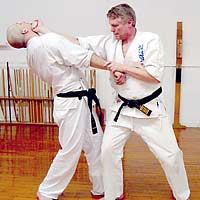
This technique can also progress further. A natural extension is to continue
the movement of your left hand into a palm-heel strike to the opponent's
nose or face. The same hand can then grab the hair and pull the head forward
into a back-hand strike (not shown), or alternatively grab the attacking
arm (pulling back) as you simultaneously strike to the face with the other
fist. If practiced, all three counter attacks (elbow, palm-heel and back-fist)
flow in a continuous and powerful multiple counterattack that can be devastating.
(1)
The advantage of this technique is that very little muscular strength
is required. It is quick and powerful, and the defense turns into a simultaneous
counter-attack. Since the attacker is off-balanced backward, this greatly
reduces or eliminates any potential secondary attack from the attacker's
opposite hand.
Here, the reader will also notice the similarity to the self-defense
technique used against a same hand grab illustrated in Part I of this
series. The technique shown here is another and alternate application
of one of the beginning moves in the karate kata Saiha.
A totally different approach to this situation is to use a wrist lock,
called a "nikyo" in aikido and some jujutsu systems, and by
other names in other systems. In this technique you manipulate the arm
and wrist into an "S" shape -- an elbow bent at a 90 degree
angle with the wrist bent back in the other direction.
Use your weight and not arm strength to pull the opponent forward at
a 45 degree angle to the side. The extra benefit is that you have moved
to the side out of range of an attack from the opposite arm. Here we have
accentuated the movement to illustrate the point.
| 
|
A common mistake made by many teachers
is to think that as a defender, it is easy to attain this position.
It is not. A person who has grabbed you is tensed and intent on
controlling you. Therefore the first move, if this technique is
to be successful, is to distract the attacker (here with an open
hand strike or slap to the face) while also leading him or her slightly
off-balance. |
| With the opponent's mind now reeling from the facial
slap or strike, and additionally off-balanced, little attention
remains focused on his grabbing arm. The attacker may just release
his grab and in this case you have escaped. But, if the person continues
to hold on, you can easily maneuver his arm into the "S"
position. To secure the grabbing hand (if it hasn't already been
released), use the palm of your opposite hand to hold the attacker's
hand in position and then move your body toward the attacker. Your
weight will begin to bend his arm inward. |
 |
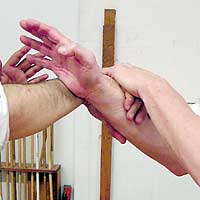
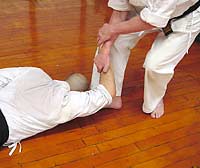
In the first photo the defender has opened his fist and circled his open
hand, inside and up over the opponent's wrist. In many jujutsu, daito-ryu,
aikido and other self-defense systems, the hand is left open. Here, however,
the hand is laid down over the wrist. It is what happens next that is
important, however (although some would maintain that the hand position
shown allows this move to be executed more easily).
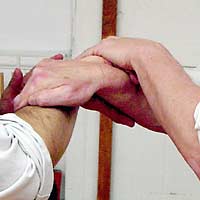
To make this technique now requires almost no force. You don't push down,
a common mistake, or otherwise try to force the technique. Instead, rotate
your hand in a circle back towards yourself (here using the index finger
of the flat hand to rotate back towards your own center). The movement
that rotates the opponent's wrist in one direction as the bent hand is
held in place is very painful and instantaneous.
When you execute this technique be careful to keep your wrists close
to your own center. While the technique also works if you extend your
wrist outward toward the opponent's center (as some systems teach it),
there is danger: the opponent, if you are not careful, can take over the
same technique (since his hands are in virtually the same position as
yours) and work the technique back on you. But if you hold your hands
close to your own center, this will not happen.
 Finally,
as you control your opponent, step backward and bring him with you to
the floor. This way you not only totally control him, but you minimize
any potential counter-attack. Finally,
as you control your opponent, step backward and bring him with you to
the floor. This way you not only totally control him, but you minimize
any potential counter-attack.
This technique has the benefit of taking control of the opponent while
also maximizing your position to minimize any potential counter. It has
the disadvantage, however, of needing to execute the technique properly
with the initial distraction, movement and off-balance.
In some karate kata you will see an open hand kaki (hooking) technique
from the inside to the outside across the body. This move is accompanied
by the opposite hand coming to rest on the hooking hand's wrist or forearm.
In some kata this can be interpreted as the above described technique.
There is a famous story told in our Wadokai Aikido organization about
a new aikido student who executed this technique with seemingly great
proficiency.
As a new graduate student (at a southern U.S. urban university), her
hours at school were long and she often studied until late. One night
at about 11 PM she left the library to get a snack at a nearby convenience
store just off campus.
She wasn't paying attention, just day dreaming and thinking to herself.
As she left the store with a soft drink and a snack, she was suddenly
grabbed by the right wrist (the attacker using his left hand). When she
looked up she saw a large scruffy young man surrounded by a group of compatriots.
"Hi honey, where are you going," said the assailant, as he
pulled her toward him. The others laughed.
She later reported, "I did that technique we practiced last week"
-- where she used her left hand to strike the opponent's face (distraction)
as she pulled back and to the side (off balance). Then she put her left
hand on top of the assailant's hand that was gripping her right wrist,
and circled her own right hand over on top of his wrist, pulling it in
while rotating her same right wrist (and the attacker's) towards herself
-- another "nikyo" technique -- one of the most painful and
powerful in the aikido repertoire.
"Ouch, ouch, hey, hey, hey" was the reply as the assailant
dropped to his knees. His friends were so shocked they backed off. And
no one wanted any more of her. She slipped back to the library a little
wiser and more alert with a newly found respect for the aikido technique
she had recently learned.
Footnote:
(1) You will notice here that you are driving
your body forward into the backfist rather than sinking backward as was
illustrated in Part I of this series of articles. In the above photo,
the body is driven into the backfist while your other arm grabs the opponent's
arm, which drives the attacker's head backward and his body off-balance
to the rear. A typical follow-up technique is an arm bar, groin strike
or leg take down. In Part I, however, the defender's body was sunk backwards.
This allows you to use your body weight to pull either the opponent's
arm back with you (as shown in Part I) or his head (not shown). With the
opponent's head not driven backwards as far, the head remains within range
for a variety of follow-up techniques. In saiha kata, for example (which
supposes a grab of the head pulling it into a backfist), follow-up techniques
include an elbow strike (same arm as the backfist) and/or a knee kick
to the opponent's head as you pull it downward (and move him off balance
to the side) followed up by a groin kick or stomp to the inside of the
upper thigh driving it outward.
About The Author:
Christopher Caile is the Founder and Editor-In-Chief of FightingArts.com.
He has been a student of the martial arts for over 40 years and holds
a 6th degree black belt in Seido Karate and has experience in judo,
aikido, diato-ryu, boxing and several Chinese fighting arts. He is also
a long-term student of one branch of Traditional Chinese Medicine, Qigong.
He is a personal disciple of the qi gong master and teacher of acupuncture
Dr. Zaiwen Shen (M.D., Ph.D.) and is Vice-President of the DS International
Chi Medicine Association. In Buffalo, NY, he founded the Qi gong Healing
Institute and The Qi Medicine Association at the State University of
New York at Buffalo. He has also written on Qi gong and other health
topics in a national magazine, the Holistic Health Journal and had been
filmed for a prospective PBS presentation on Alternative Medicine. Recently
he contributed a chapter on the subject to an award winning book on
alternative medicine, "Resources Guide To Alternative Health."
|